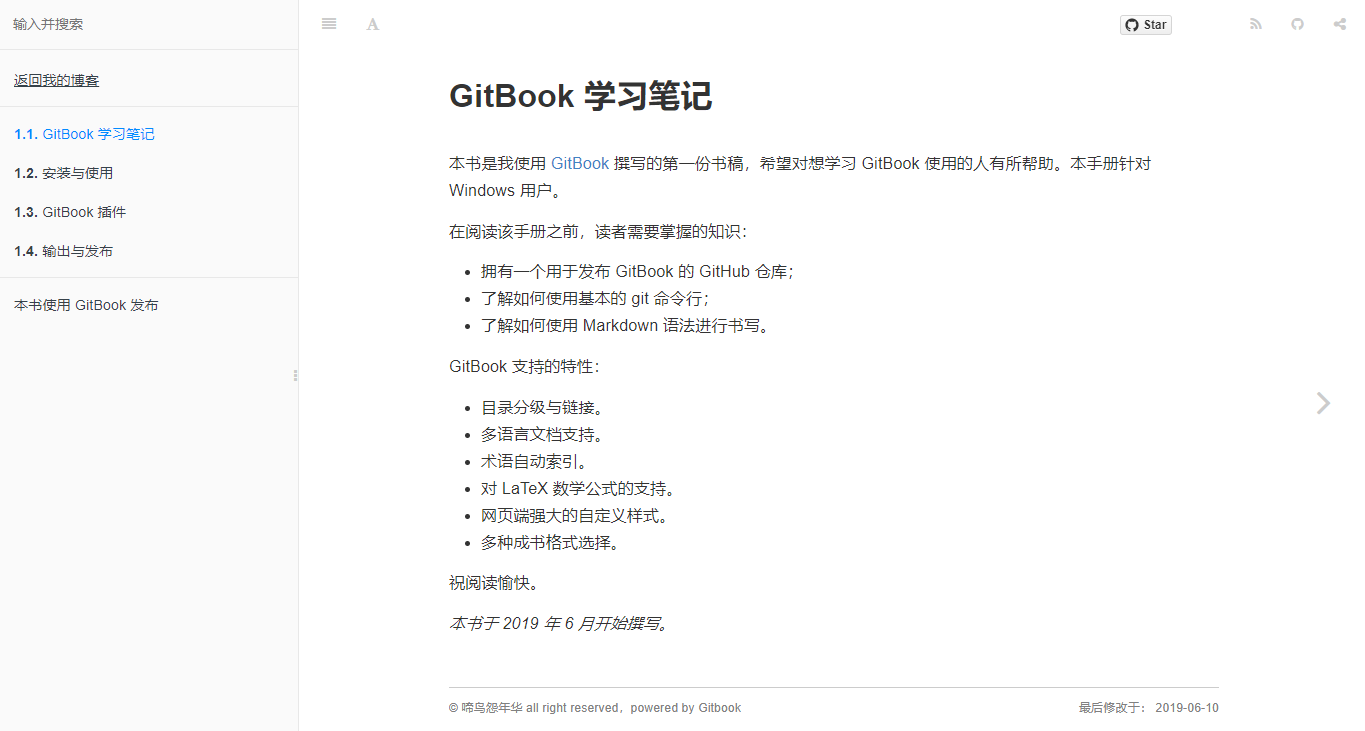
使用 GitBook 制作电子书

gitbook-logo.png

上个月的期末考试周前,我正使用 Chris Wu 的 Note-by-LaTeX 手册对 LaTeX 排版进行系统性的学习,无意间瞥见其使用 GitBook 编写的电子书项目,便点进去一探究竟。Chris Wu 将其学习的课程笔记很有条理地记录在 GitBook 中,每一章节的结构在左侧显示,清晰明了。你还可以调整阅读的字体、文字大小、背景的亮暗主题。GitBook 还支持很多的插件使用,你可以在文章中优雅地插入数学公式、图表等等。当然,GitBook 的书写也离不开 Markdown。

我意识到,这是一个记录课程笔记再好不过的工具,不同于将课程笔记记录在纸质笔记本或者 iPad 或者 OneNote 中,使用 GitBook,你可以在网络上在线阅读你的笔记,将你的笔记分享给其他有需要的人。所以我在考试周前作大死花了一天的时间学习了如何使用 GitBook,写出来了一个半成品。

my-first-gitbook.png◎ 我的第一本 GitBook 电子书

GitBook 简介

GitBook 是一个基于 Node.js 的命令行工具,支持 Markdown 语法格式,可以输出 HTML、PDF、eBook 等格式的电子书。

GitBook 支持的特性:

  • 目录分级与链接。
  • 多语言文档支持。
  • 术语自动索引。
  • 对 LaTeX 数学公式的支持。
  • 网页端强大的自定义样式。
  • 多种成书格式选择。

安装与使用

Node.js 的安装

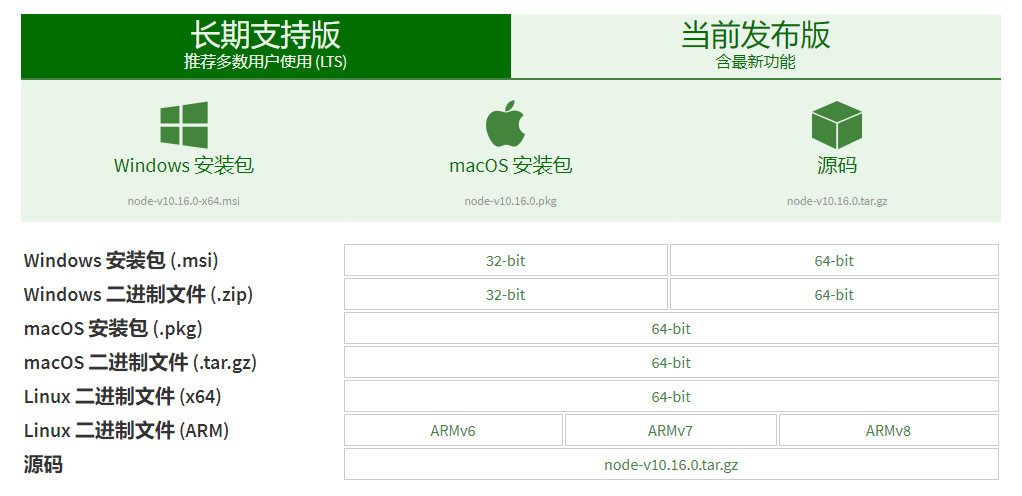
在官方网站首页就提供了 Node.js 的下载链接。我推荐下载长期支持的版本。

download-nodejs.png◎ 下载 Node.js

预设的情况下,会下载 .msi 格式的安装包,如果你想要使用其他不同形式的安装文件,可以从其官网下载地址页面下载安装。Windows 的安装包除了 .exe.msi 两种格式外,还分为 32-bit 与 64-bit 两种,请读者根据自己的计算机配置选择合适的安装包进行安装。

choose-nodejs-version.png◎ 选择 Node.js 版本

安装完成这后,你可以在终端模式下检验一下:

$ node -v
v0.10.28

看到这些提示,就表示你已成功安装上了 Node.js

GitBook 的安装

你需要在安装完成 Node.js 后,再利用命令行安装 GitBook。

在命令行中输入:

1
$ npm install gitbook-cli -g

新建一个存放你的 GitBook书籍的文件夹,在该文件夹处打开 Git 命令行:

1
$ gitbook init

安装完成,可以输入 -V 命令查看 GitBook 版本号,以确定成功安装:

1
2
3
$ gitbook -V
CLI version: 2.3.2
GitBook version: 3.2.3

在该文件夹中,会生成两个文件,分别是 README.mdSUMMARY.md,这是两个必要文件。

1
2
3
4
5
6
$ tree book/
book/
├── README.md
└── SUMMARY.md

0 directories, 2 files

README.md 是对书籍的简单介绍:

1
2
3
4
$ cat book/README.md 
# README

This is a book powered by [GitBook](https://github.com/GitbookIO/gitbook).

SUMMARY.md 是书籍的目录结构。内容如下:

1
2
3
4
5
6
7
$ cat book/SUMMARY.md 
# SUMMARY

* [Chapter1](chapter1/README.md)
  * [Section1.1](chapter1/section1.1.md)
  * [Section1.2](chapter1/section1.2.md)
* [Chapter2](chapter2/README.md)

我们可以通过使用「标题」或者「水平分割线」标志将 GitBook 分为几个不同的部分:

 1
 2
 3
 4
 5
 6
 7
 8
 9
10
11
12
13
14
15
16
# Summary

### Part I

* [Introduction](README.md)
* [Writing is nice](part1/writing.md)
* [GitBook is nice](part1/gitbook.md)

### Part II

* [We love feedback](part2/feedback_please.md)
* [Better tools for authors](part2/better_tools.md)

----

* [Last part without title](part3/title.md)

README 的书写格式

GitBook 的安装 这一章节中已经提到,README.md 是对书籍的简单介绍。

SUMMARY 的书写格式

这个文件是一本书的目录结构,在 GitBook 的安装这一章节中已经提到,比如:

* [GitBook 学习笔记](README.md)
* [安装与使用](install/README.md)
    * [Node.js 的安装](install/Nodejsinstall.md)
    * [GitBook 的安装](install/gitbookinstall.md)
    * [README.md 与 SUMMARY 的编写](install/file.md)
    * [book.json 的内容](install/bookjson.md)
    * [GitBook 命令行速览](install/gitbookcli.md)
* [GitBook 插件](plugin/README.md)
    * [默认插件](plugin/default.md)
    * [插件的安装与加载](plugin/install.md)
* [输出与发布](publish/README.md)
    * [输出为静态网页](publish/outfile.md)
    * [输出为PDF](publish/pdffile.md)
    * [发布到 Github Pages](publish/gitpages.md)

列表加链接,链接中可以使用目录,也可以不使用。

book.json 的内容

book.json 文件包含了你编写的这本书中的基本信息。需要将此文件放置在你所编书籍的根目录中。

其主要的字段有:

  • title:书籍名称
  • author:作者
  • description:书籍描述
  • language:当前书籍语言
  • gitbook:欲调用的 GitBook 版本号
  • links:设置主页链接,显示在侧栏
  • styles:页面 CSS 样式。
  • structure:关键文件位置。
  • plugins:插件加载。
  • pluginsConfig:插件参数。

比如:

 1
 2
 3
 4
 5
 6
 7
 8
 9
10
11
12
13
14
15
16
17
18
19
20
21
22
23
24
25
26
27
28
29
30
31
32
33
34
35
36
37
38
39
40
41
42
43
44
45
46
47
48
49
50
51
52
53
54
55
56
57
58
59
60
61
62
63
64
65
66
67
68
69
70
71
72
73
74
75
76
77
78
79
80
81
82
83
84
85
86
87
88
89
90
{
    "title": "GitBook-Learning",
    "author": "啼鸟怨年华",
    "description": "介绍如何使用 GitBook。",
    "language": "zh-hans",
    "gitbook": "3.2.3",
    "links": {
        "sidebar": {
            "返回我的主页": "https://blog.guanqr.com"
        }
    },
    "styles": {
        "website": "./styles/website.css"
    },
    "structure": {
        "readme": "README.md"
    },
     "plugins": [
        "-sharing","sharing-plus",
        "highlight",
        "-lunr", "-search", "search-pro",
        "splitter",
        "collapsible-menu",
        "katex",
        "code",
        "github", "github-buttons",
        "tbfed-pagefooter",
        "back-to-top-button",
        "anchors",
        "rss"
    ],
    "pluginsConfig": {
        "theme-default": {
            "showLevel": true
        },
        "sharing": {
            "douban": false,
            "facebook": false,
            "google": false,
            "hatenaBookmark": false,
            "instapaper": false,
            "line": false,
            "linkedin": false,
            "messenger": false,
            "pocket": false,
            "qq": false,
            "qzone": false,
            "stumbleupon": false,
            "twitter": false,
            "viber": false,
            "vk": false,
            "weibo": false,
            "whatsapp": false,
            "all": [
                "douban","qzone","weibo","facebook", "google", "twitter"     
            ]
        },
        "github": {
            "url": "https://github.com/guanqr"
        },
        "github-buttons": {
            "buttons": [{
                "user": "guanqr",
                "repo": "gitbook",
                "type": "star",
                "size": "small",
                "count": true
                }
            ]
        },
        "tbfed-pagefooter": {
            "copyright":"&copy 啼鸟怨年华",
            "modify_label": "最后修改于:",
            "modify_format": "YYYY-MM-DD"
        },
        "rss": {
            "title": "GitBook 学习笔记",
            "description": "介绍如何使用 GitBook。",
            "author": "啼鸟怨年华",
            "feed_url": "https://blog.guanqr.com/gitbook/how-to-use-gitbook/rss",
            "site_url": "https://blog.guanqr.com/gitbook/how-to-use-gitbook/",
            "managingEditor": "[email protected]",
            "webMaster": "[email protected]",
            "categories": [
                "gitbook"
            ]
        }

    }
}

GitBook 命令行速览

一些常用的命令

gitbook init    //初始化目录文件
gitbook help    //列出gitbook所有的命令
gitbook --help  //输出gitbook-cli的帮助信息
gitbook build   //生成静态网页
gitbook serve   //生成静态网页并运行服务器
gitbook build --gitbook=2.0.1   //生成时指定gitbook的版本, 本地没有会先下载
gitbook ls  //列出本地所有的gitbook版本
gitbook ls-remote   //列出远程可用的gitbook版本
gitbook fetch 标签/版本号   //安装对应的gitbook版本
gitbook update  //更新到gitbook的最新版本
gitbook uninstall 2.0.1     //卸载对应的gitbook版本
gitbook build --log=debug   //指定log的级别
gitbook builid --debug  //输出错误信息

gitbook

$ gitbook
Usage: gitbook [options] [command]


 Commands:

   ls                        List versions installed locally
   current                   Display currently activated version
   ls-remote                 List remote versions available for install
   fetch [version]           Download and install a <version>
   alias [folder] [version]  Set an alias named <version> pointing to <folder>
   uninstall [version]       Uninstall a version
   update [tag]              Update to the latest version of GitBook
   help                      List commands for GitBook
   *                         run a command with a specific gitbook version

 Options:

   -h, --help               output usage information
   -v, --gitbook [version]  specify GitBook version to use
   -d, --debug              enable verbose error
   -V, --version            Display running versions of gitbook and gitbook-cli

gitbook ls

$ gitbook ls
GitBook Versions Installed:

    * 3.2.3

Run "gitbook update" to update to the latest version.

gitbook ls-remote

$ gitbook ls-remote
Available GitBook Versions:

     4.0.0-alpha.6, 4.0.0-alpha.5, 4.0.0-alpha.4, 4.0.0-alpha.3, 4.0.0-alpha.2, 4.0.0-alpha.1, 3.2.3, 3.2.2, 3.2.1, 3.2.0, 3.2.0-pre.1, 3.2.0-pre.0, 3.1.1, 3.1.0, 3.0.3, 3.0.2, 3.0.1, 3.0.0, 3.0.0-pre.15, 3.0.0-pre.14, 3.0.0-pre.13, 3.0.0-pre.12, 3.0.0-pre.11, 3.0.0-pre.10, 3.0.0-pre.9, 3.0.0-pre.8, 3.0.0-pre.7, 3.0.0-pre.6, 3.0.0-pre.5, 3.0.0-pre.4, 3.0.0-pre.3, 3.0.0-pre.2, 3.0.0-pre.1, 2.6.9, 2.6.8, 2.6.7, 2.6.6, 2.6.5, 2.6.4, 2.6.3, 2.6.2, 2.6.1, 2.6.0, 2.5.2, 2.5.1, 2.5.0, 2.5.0-beta.7, 2.5.0-beta.6, 2.5.0-beta.5, 2.5.0-beta.4, 2.5.0-beta.3, 2.5.0-beta.2, 2.5.0-beta.1, 2.4.3, 2.4.2, 2.4.1, 2.4.0, 2.3.3, 2.3.2, 2.3.1, 2.3.0, 2.2.0, 2.1.0, 2.0.4, 2.0.3, 2.0.2, 2.0.1, 2.0.0, 2.0.0-beta.5, 2.0.0-beta.4, 2.0.0-beta.3, 2.0.0-beta.2, 2.0.0-beta.1, 2.0.0-alpha.9, 2.0.0-alpha.8, 2.0.0-alpha.7, 2.0.0-alpha.6, 2.0.0-alpha.5, 2.0.0-alpha.4, 2.0.0-alpha.3, 2.0.0-alpha.2, 2.0.0-alpha.1

Tags:

     latest : 2.6.9
     pre : 4.0.0-alpha.6

注意:gitbook serve 命令长久以来被发现不稳定,时常产生 ENOENT 错误。解决办法是,前往 /lib/output/website/ 文件夹,将 copyPluginAssets.js 文件最后一个 fs.copyDir 中的 confirm 项的值由 true 改为 false。在 Windows 上,该文件的路径通常形如:C:/Users/[你的用户名]/.gitbook/versions/[你的 Gitbook 版本号]/lib/output/website

GitBook 插件

部分工作借助插件可以很好地完成,不需要再手动去修改默认的 CSS 等文件。

插件的安装与加载

book.json 文件中的 plugins 项,可以进行插件加载的管理.在每次运行预览命令 gitbook serve 或构建命令 gitbook build 前,如果新增了加载的插件,则需要插入新的一句命令:

$ gitbook install ./

该命令的作用是安装对应的插件.之后再预览或构建,插件就能正常加载了。

默认加载插件

Gitbook 默认自带了 5 个插件:

  • fontsettings:字体插件。
  • highlight:代码高亮插件,一般使用 prism 代替。
  • search 与 lunr:搜索插件.由于不能搜索中文,建议用 search-pro 替换。
  • sharing:分享插件.对本土化的支持有限,可改用 sharing-plus。

如果想要禁用默认插件,在 plugins 指明并前缀符号 - 即可,例如:

1
2
3
4
5
6
{
    "plugins": [
        "-sharing", 
        "-highlight", "prism"
    ]
}

上例中,第一行表示禁用 sharing 插件,第二行表示禁用 highlight 插件并启用 prism 插件。JSON 格式没有换行格式要求,我这样书写是为了清楚地展现插件功能之间的联系。

插件汇总

记录一些实用的插件, 如果要指定插件的版本可以使用 [email protected]。下面的插件在 GitBook 的 3.2.3 版本中可以正常工作,因为一些插件可能不会随着 GitBook 版本的升级而升级,即下面的插件可能不适用高版本的 GitBook,所以这里指定了 GitBook 的版本。这里只是列举了一部分插件。

Disqus

添加 disqus 评论。

 1
 2
 3
 4
 5
 6
 7
 8
 9
10
{
    "plugins": [
        "disqus"
    ],
    "pluginsConfig": {
        "disqus": {
            "shortName": "gitbookuse"
        }
    }
}

Search Plus

支持中文搜索, 需要将默认的 searchlunr 插件去掉。

1
2
3
{
    "plugins": ["-lunr", "-search", "search-plus"]
}

Prism

使用 Prism.js 为语法添加高亮显示,需要将 highlight 插件去掉。该插件自带的主题样式较少,可以再安装 prism-themes 插件,里面多提供了几种样式,具体的样式可以参考这里,在设置样式时要注意设置 CSS 文件名,而不是样式名。

 1
 2
 3
 4
 5
 6
 7
 8
 9
10
11
12
13
{
    "plugins": [
        "prism",
        "-highlight"
    ],
    "pluginsConfig": {
        "prism": {
            "css": [
                "prism-themes/themes/prism-base16-ateliersulphurpool.light.css"
            ]
        }
    }
}

如果需要修改背景色、字体大小等,可以在 website.css 定义 pre[class*="language-"] 类来修改,下面是一个示例:

1
2
3
4
5
6
pre[class*="language-"] {
    border: none;
    background-color: #f7f7f7;
    font-size: 1em;
    line-height: 1.2em;
}

Advanced Emoji

支持 emoji 表情

1
2
3
4
5
{
    "plugins": [
        "advanced-emoji"
    ]
}

Github

添加 GitHub 图标。

 1
 2
 3
 4
 5
 6
 7
 8
 9
10
{
    "plugins": [
        "github"
    ],
    "pluginsConfig": {
        "github": {
            "url": "https://github.com/zhangjikai"
        }
    }
}

Github Buttons

添加项目在 GitHub 上的 star、watch、fork 情况。

 1
 2
 3
 4
 5
 6
 7
 8
 9
10
11
12
13
14
15
16
{
    "plugins": [
        "github-buttons"
    ],
    "pluginsConfig": {
        "github-buttons": {
            "repo": "zhangjikai/gitbook-use",
            "types": [
                "star",
                "watch",
                "fork"
            ],
            "size": "small"
        }
    }
}

Ace Plugin

使 GitBook 支持 ace 。默认情况下,line-height1,会使代码显得比较挤,而作者好像没提供修改行高的选项,如果需要修改行高,可以到 node_modules -> github-plugin-ace -> assets -> ace.js 中加入下面两行代码 (30 行左右的位置):

1
2
editor.container.style.lineHeight = 1.25;
editor.renderer.updateFontSize();

不过上面的做法有个问题就是,每次使用 gitbook install 安装新的插件之后,代码又会重置为原来的样子。另外可以在 website.css 中加入下面的 CSS 代码来指定 ace 字体的大小

1
2
3
.aceCode {
  font-size: 14px !important;
}

使用插件:

1
2
3
4
5
{
    "plugins": [
        "ace"
    ]
}

Emphasize

为文字加上底色。

1
2
3
4
5
{
    "plugins": [
        "emphasize"
    ]
}

KaTeX

为了支持数学公式, 我们可以使用 KaTeX 和 MathJax 插件, KaTeX 的渲染速度要快于 MathJax,但 MathJax 支持的语法更多。

1
2
3
4
5
{
    "plugins": [
        "katex"
    ]
}

Include Codeblock

使用代码块的格式显示所包含文件的内容. 该文件必须存在。插件提供了一些配置,可以区插件官网查看。如果同时使用 ace 和本插件,本插件要在 ace 插件前面加载。

 1
 2
 3
 4
 5
 6
 7
 8
 9
10
11
12
{
    "plugins": [
        "include-codeblock"
    ],
    "pluginsConfig": {
        "include-codeblock": {
            "template": "ace",
            "unindent": "true",
            "theme": "monokai"
        }
    }
}

Splitter

使侧边栏的宽度可以自由调节。

1
2
3
4
5
{
    "plugins": [
        "splitter"
    ]
}

Mermaid-gb3

支持渲染 Mermaid 图表。

1
2
3
4
5
{
    "plugins": [
        "mermaid-gb3"
    ]
}

Puml

使用 PlantUML 展示 uml 图。

1
2
3
{
    "plugins": ["puml"]
}

Graph

使用 function-plot 绘制数学函数图。

1
2
3
{
    "plugins": [ "graph" ],
}

Chart

使用 C3.js 或者 Highcharts 绘制图形。

1
2
3
4
5
6
7
8
{
    "plugins": [ "chart" ],
    "pluginsConfig": {
        "chart": {
            "type": "c3"
        }
    }
}

type 可以是 c3 或者 highcharts, 默认是 c3

Sharing-plus

分享当前页面,比默认的 sharing 插件多了一些分享方式。

1
2
3
{
    "plugins": ["-sharing", "sharing-plus"]
}

配置:

 1
 2
 3
 4
 5
 6
 7
 8
 9
10
11
12
13
14
15
16
17
18
19
20
21
22
23
24
25
26
27
28
{
    "pluginsConfig": {
        "sharing": {
           "douban": false,
           "facebook": false,
            "google": true,
            "hatenaBookmark": false,
            "instapaper": false,
            "line": true,
           "linkedin": true,
           "messenger": false,
           "pocket": false,
           "qq": false,
           "qzone": true,
           "stumbleupon": false,
           "twitter": false,
           "viber": false,
           "vk": false,
           "weibo": true,
           "whatsapp": false,
           "all": [
                "facebook", "google", "twitter",
                "weibo", "instapaper", "linkedin",
                "pocket", "stumbleupon"
            ]
        }
    }
}

为页面添加页脚。

 1
 2
 3
 4
 5
 6
 7
 8
 9
10
11
12
{
    "plugins": [
        "tbfed-pagefooter"
    ],
    "pluginsConfig": {
        "tbfed-pagefooter": {
            "copyright":"Copyright &copy zhangjikai.com 2017",
            "modify_label": "该文件修订时间:",
            "modify_format": "YYYY-MM-DD HH:mm:ss"
        }
    }
}

Expandable-chapters-small

使左侧的章节目录可以折叠。

1
2
3
{
    "plugins": ["expandable-chapters-small"]
}

Sectionx

将页面分块显示,标签的 tag 最好是使用 b 标签,如果使用 h1-h6 可能会和其他插件冲突。

 1
 2
 3
 4
 5
 6
 7
 8
 9
10
{
    "plugins": [
       "sectionx"
    ],
    "pluginsConfig": {
        "sectionx": {
            "tag": "b"
        }
    }
}

GA

Google 统计。

 1
 2
 3
 4
 5
 6
 7
 8
 9
10
{
    "plugins": [
        "ga"
    ],
    "pluginsConfig": {
        "ga": {
            "token": "UA-XXXX-Y"
        }
    }
}

3-ba

百度统计。

1
2
3
4
5
6
7
8
{
    "plugins": ["3-ba"],
    "pluginsConfig": {
        "3-ba": {
            "token": "xxxxxxxx"
        }
    }
}

打赏插件。

 1
 2
 3
 4
 5
 6
 7
 8
 9
10
11
12
13
14
15
{
    "plugins": [
        "donate"
    ],
    "pluginsConfig": {
        "donate": {
            "wechat": "https://yourwebsite/resource/weixin.png",
            "alipay": "https://yourwebsite/resource/alipay.png",
            "title": "",
            "button": "赏",
            "alipayText": "支付宝打赏",
            "wechatText": "微信打赏"
        }
    }
}

Local Video

使用 Video.js 播放本地视频。

1
2
3
{
    "plugins": [ "local-video" ]
}

为了使视频可以自适应,指定视频的 width 为100%,并设置宽高比为 16:9,如下面所示:

 1
 2
 3
 4
 5
 6
 7
 8
 9
10
{% raw %}
<video id="my-video" class="video-js" controls preload="auto" width="100%"
poster="https://yourimage.jpg" data-setup='{"aspectRatio":"16:9"}'>
  <source src="https://yourvideo.mp4" type='video/mp4' >
  <p class="vjs-no-js">
    To view this video please enable JavaScript, and consider upgrading to a web browser that
    <a href="http://videojs.com/html5-video-support/" target="_blank">supports HTML5 video</a>
  </p>
</video>
{% endraw %}

另外还要再配置下 CSS,即在 website.css 中加入:

1
2
3
4
.video-js {
    width:100%;
    height: 100%;
}

Simple-page-toc

自动生成本页的目录结构。另外 GitBook 在处理重复的标题时有些问题,所以尽量不适用重复的标题。

 1
 2
 3
 4
 5
 6
 7
 8
 9
10
11
{
    "plugins" : [
        "simple-page-toc"
    ],
    "pluginsConfig": {
        "simple-page-toc": {
            "maxDepth": 3,
            "skipFirstH1": true
        }
    }
}

使用方法: 在需要生成目录的地方加上 <!-- toc -->

Anchors

添加 GitHub 风格的锚点样式。

1
2
3
{
    "plugins" : [ "anchors" ]
}

Anchor-navigation-ex

添加 TOC 到侧边悬浮导航以及回到顶部按钮。需要注意以下两点:

  • 本插件只会提取 h[1-3] 标签作为悬浮导航
  • 只有按照以下顺序嵌套才会被提取
# h1
## h2
### h3
必须要以 h1 开始,直接写 h2 不会被提取
## h2
 1
 2
 3
 4
 5
 6
 7
 8
 9
10
11
12
13
14
{
    "plugins": [
        "anchor-navigation-ex"
    ],
    "pluginsConfig": {
        "anchor-navigation-ex": {
            "isRewritePageTitle": true,
            "isShowTocTitleIcon": true,
            "tocLevel1Icon": "fa fa-hand-o-right",
            "tocLevel2Icon": "fa fa-hand-o-right",
            "tocLevel3Icon": "fa fa-hand-o-right"
        }
    }
}

如果将 GitBook 的源文件保存到 GitHub 或者其他的仓库上,使用该插件可以链接到当前页的源文件上。

1
2
3
4
5
6
7
8
9
{
    "plugins": ["edit-link"],
    "pluginsConfig": {
        "edit-link": {
            "base": "https://github.com/USER/REPO/edit/BRANCH",
            "label": "Edit This Page"
        }
    }
}

Sitemap-general

生成 sitemap。

1
2
3
4
5
6
7
8
{
    "plugins": ["sitemap-general"],
    "pluginsConfig": {
        "sitemap-general": {
            "prefix": "http://gitbook.zhangjikai.com"
        }
    }
}

Favicon

更改网站的 favicon.ico。

 1
 2
 3
 4
 5
 6
 7
 8
 9
10
11
12
13
14
15
16
{
    "plugins": [
        "favicon"
    ],
    "pluginsConfig": {
        "favicon": {
            "shortcut": "assets/images/favicon.ico",
            "bookmark": "assets/images/favicon.ico",
            "appleTouch": "assets/images/apple-touch-icon.png",
            "appleTouchMore": {
                "120x120": "assets/images/apple-touch-icon-120x120.png",
                "180x180": "assets/images/apple-touch-icon-180x180.png"
            }
        }
    }
}

Todo

添加 Todo 功能。默认的 checkbox 会向右偏移 2em,如果不希望偏移,可以在 website.css 里加上下面的代码:

1
2
3
input[type=checkbox]{
    margin-left: -2em;
}
1
2
3
{
    "plugins": ["todo"]
}

Terminal

模拟终端显示,主要用于显示命令以及多行输出,不过写起来有些麻烦。

 1
 2
 3
 4
 5
 6
 7
 8
 9
10
11
12
{
    "plugins": [
        "terminal"
    ],
    "pluginsConfig": {
        "terminal": {
            "copyButtons": true,
            "fade": false,
            "style": "flat"
        }
    }
}

现在支持 6 种标签:

  • command: Command "executed" in the terminal.
  • delimiter: Sequence of characters between the prompt and the command.
  • error: Error message.
  • path: Directory path shown in the prompt.
  • prompt: Prompt of the user.
  • warning: Warning message.

标签的使用格式如下所示:

**[<tag_name> 内容]

为了使标签正常工作,需要在代码块的第一行加入**[termial]标记,下面是一个使用示例:

**[terminal]
**[prompt foo@joe]**[path ~]**[delimiter  $ ]**[command ./myscript]
Normal output line. Nothing special here...
But...
You can add some colors. What about a warning message?
**[warning [WARNING] The color depends on the theme. Could look normal too]
What about an error message?
**[error [ERROR] This is not the error you are looking for]

terminal 支持下面 5 种样式,如果需要更换样式,在 pluginsConfig 里配置即可。

  • black: Just that good old black terminal everybody loves.
  • classic: Looking for green color font over a black background? This is for you.
  • flat: Oh, flat colors. I love flat colors. Everything looks modern with them.
  • ubuntu: Admit it or not, but Ubuntu have a good looking terminal.
  • white: Make your terminal to blend in with your GitBook.

Copy-code-button

为代码块添加复制的按钮。

1
2
3
{
    "plugins": ["copy-code-button"]
}

Alerts

添加不同 alerts 样式的 blockquotes,目前包含 info, warning, danger 和 success 四种样式。

1
2
3
{
    "plugins": ["alerts"]
}

下面是使用示例:

Info styling
> **[info] For info**
>
> Use this for infomation messages.

Warning styling
> **[warning] For warning**
>
> Use this for warning messages.

Danger styling
> **[danger] For danger**
>
> Use this for danger messages.

Success styling
> **[success] For info**
>
> Use this for success messages.

Klipse

集成 Klipse (online code evaluator)。

1
2
3
{
    "plugins": ["klipse"]
}

Klipse 目前支持下面的语言:

  • javascript: evaluation is done with the javascript function eval and pretty printing of the result is done with pretty-format
  • clojure[script]: evaluation is done with Self-Hosted Clojurescript
  • ruby: evaluation is done with Opal
  • C++: evaluation is done with JSCPP
  • python: evaluation is done with Skulpt
  • scheme: evaluation is done with BiwasScheme
  • PHP: evaluation is done with Uniter
  • BrainFuck
  • JSX
  • EcmaScript2017
  • Google Charts: See Interactive Business Report with Google Charts.

Versions-select

添加版本选择的下拉菜单,针对文档有多个版本的情况。

 1
 2
 3
 4
 5
 6
 7
 8
 9
10
11
12
13
14
15
16
17
{
    "plugins": [ "versions-select" ],
    "pluginsConfig": {
        "versions": {
            "options": [
                {
                    "value": "https://yourwebsite",
                    "text": "v3.2.2"
                },
                {
                    "value": "https://yourwebsite/v2/",
                    "text": "v2.6.4"
                }
            ]
        }
    }
}

我们可以自定义 CSS 来修改 select 的显示样式:

1
2
3
4
5
6
.versions-select select {
    height: 2em;
    line-height: 2em;
    border-radius: 4px;
    background: #efefef;
}

RSS

添加 RSS 订阅功能。

 1
 2
 3
 4
 5
 6
 7
 8
 9
10
11
12
13
14
15
16
17
{
    "plugins": [ "rss" ],
    "pluginsConfig": {
        "rss": {
            "title": "~",
            "description": "~",
            "author": "~",
            "feed_url": "https://yourwebsite/rss",
            "site_url": "https://yourwebsite/",
            "managingEditor": "~",
            "webMaster": "~",
            "categories": [
                "~"
            ]
        }
    }
}

输出与发布

GitBook 支持多种输出格式,这里主要讲述如何将 GitBook 发布在 GitHub Pages 上。

输出为静态网页

你有以下两种方式输出一个静态网站。

本地预览时自动生成

当你在自己的电脑上编辑好图书之后,你可以使用 GitBook 的命令行进行本地预览:

$ gitbook serve

这里会启动一个端口为 4000 用于预览的服务器:

$ gitbook serve
Press CTRL+C to quit ...
Starting build ...
Successfuly built !
Starting server ...
Serving book on http://localhost:4000

你可以你的浏览器中打开这个网址:http://localhost:4000

这里你会发现,你在你的图书项目的目录中多了一个名为 _book 的文件目录,而这个目录中的文件,即是生成的静态网站内容。

使用 build 参数生成到指定目录

与直接预览生成的静态网站文件不一样的是,使用这个命令,你可以将内容输入到你所想要的目录中去:

$ mkdir /tmp/gitbook
$ gitbook build --output=/tmp/gitbook
Starting build ...
Successfuly built !
$ ls /tmp/gitbook/
LICENSE           howtouse          manifest.appcache search_index.json
book              imgs              output
gitbook           index.html        publish

发布到 GitHub Pages

将编写好的格式为 .md 的文件通过 GitBook 处理,然后再发布到 GitHub Gages 上去。上文提到,输出静态网页后会在当前 GitBook 文件夹中生成一个名为 _book 的文件目录,此文件夹中的所有内容即为你需要发布到 GitHub Pages 上的内容。

创建仓库与分支

  • 登录到 GitHub,创建一个新的仓库,名称我们就命令为 book,这样我就就得到了一个 book 的空仓库。
  • 克隆仓库到本地:git clone [email protected]:USER_NAME/book.git
  • 创建一个新分支:git checkout -b gh-pages,注意,分支名必须为 gh-pages
  • 将分支 push 到仓库:git push -u origin gh-pages
  • 切换到主分支: git checkout master

经过这一步处理,我们已经创建好 gh-pages 分支了,有了这个分支,GitHub会自动为你分配一个访问网址:

http://USERNAME.github.io/book

上传文件到分支

  • gh-pages 分支 clone 到本地:
git clone -b gh-pages [email protected]:USERNAME/book.git book-end
  • _book 文件夹内容全部复制到 clone 到本地的文件夹 book-end 中。
  • book-end 文件夹 push 到仓库。

这样,你的一本 GitBook 电子书就诞生了。

加载评论
点击刷新